Are you looking for a screw-free solution to connect two pieces of wood? If you have access to a laser cutter, we might have just the thing for you.
The Idea
Not too long ago, I was searching for a simple method for producing a few hundred small custom brackets. These brackets consisted of two parts, and with our access to laser technology, using the laser cutter was the obvious choice.
The brackets would be made from two separate parts, both cut by the laser. Because I had to make so many, I was looking for a fast way to connect the two pieces together. The concept of using a wedged joint immediately came to mind, and I could not resist testing it. And it certainly was successful!
In the end, we discovered that we did not actually need the brackets (and it is always better to have no unnecessary parts lying around), but we did create a fascinating new joint that can be cut with your laser.

How Does it Work?
The joint consists of two main parts: the tenon, which acts as the insert, and the mortise, which serves as the opening. The design of the tenon allows for a wedge to be driven between its split sides, exerting pressure and securing the joint in place. What is unique is that the wedge is seamlessly (literally) integrated into the design, held in place by two small tabs. To assemble the joint, simply insert the tenon into the mortise and use a hammer to tap the wedge until it is level with the surface. Voila! The pieces are now firmly joined together.

Advantages
What is interesting about this joint is how quickly and easily it can be assembled. With just one strike of a hammer, you are done. You do not even need to pick up and insert the wedge. Additionally, the advantage of being able to laser this joint is that once you have the correct design (which is free to download, see below), you can consistently replicate it with minimal effort. Furthermore, this joint requires no screws or glue, which not only saves you money and hassle, but also adds to the elegance of using a single material and production method. Personally, I find this aspect truly exciting.
If desired, the tenon can be extended slightly above the mortise top, allowing for the opportunity to create a smooth surface by using sandpaper to remove the lasered edge. This will result in a clean and polished appearance.

Cons
Of course, like anything, there are drawbacks to consider. While this joint is quite strong, it may not be suitable for very soft woods like poplar or balsa, as they may cause the joint to break with enough force. However, there are remedies for this issue such as using harder woods like birch or adding a small amount of glue for added strength.
Another consideration is the potential for material loss. Since the wedge sticks out, it may affect the efficiency of nesting your parts. If material efficiency is important to you, you could separate the wedge and place them in a leftover corner of your material.
Furthermore, when working with thicker materials, it is important to note that lasers may leave a slightly wider kerf at the bottom compared to the top of the sheet. This can potentially cause the wedge to shift sideways where there is more space. While this is not a significant issue, it is worth monitoring. It is possible to realign the wedge by gently tapping it back into place if necessary.
Suitable Materials
As mentioned earlier, plywood is an excellent choice for this joint. The clamping force is stronger with harder woods, such as birch plywood. MDF also works well, especially with a thickness of 6mm and above. Thinner materials can be used, but they may not provide the same level of strength.
When it comes to bamboo, it can be a bit tricky. While bamboo is a hard wood, it is prone to breaking along the grains. If you decide to use bamboo, make sure to pay attention to the grain direction and ensure that the clamping force runs parallel to the grains, not perpendicular.
While HDPE and POM can work, they are quite slippery materials, which may affect the strength of the joint. It would be more suitable to use a version with a form-fit connection for these materials.
Acrylic is not the best choice for this joint. Although it may work to some extent, I would not trust it in the long term. Acrylic is a brittle material and is prone to developing cracks and breaks in stressed areas.
Solid woods are a great option as well. They are easy to cut with your laser and if you use solid wood without any fasteners or glue, you will have a truly singular-material product. This not only adds elegance to your design but also makes it natural, renewable, and perfect for recycling. That is something that I hope ignites the passion of many a maker or designer.

Possible Applications
This joint truly shines when there is a need to create a large quantity of parts. It not only saves a considerable amount of time during assembly but also reduces costs on fasteners. Moreover, it can be used to create a wide range of furniture, boxes, sculptures, and more. As an example, we have created a simple side table using 9mm birch ply to demonstrate its practicality.
Future Improvements
A potential additional version of this joint could utilise a form fit to hold the parts together, in contrast to the press-fit. One idea is to extend the tenon above the mortise surface and add stepped 'hooks' on both sides. When the wedge is inserted, these hooks would be pressed over the edges of the mortise, securely locking it in place. This design could even potentially pull the two parts together during engagement.
Currently, the design is 20mm wide, and I have adapted to different material thicknesses. While it is possible to create a smaller or larger version, it would require some adjustments to the depth and width of the fingers to ensure optimal functionality.

How Should We Call It?
While I am not an expert in woodworking, I believe this joint is based on the principle of a mortise and tenon joint. There is a similar joint called a fox-wedge mortise and tenon joint in woodworking, although it is not exactly the same. For simplicity, I think I will refer to it as the hammer joint instead of the laser fox wedge mortise and tenon joint, as the latter is not easy to pronounce.
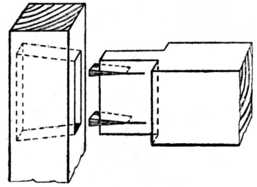
(The fox wedge mortise and tenon joint. illustration from this website )
Downloads
Is this something you could use in your projects? You can! Below you will find drawings of the connection for different thicknesses, plus a parametric version that you can adjust yourself. You will also find the drawings for the side table.
The Hammer Joint © 2023 by Jiskar Schmitz from Lasersheets may be used without restrictions!

- Hammer joint for 3mm, 4mm, 5mm, 6mm, 9mm, 10mm and 12mm (2d vector pdf)
- Hammer joint for 6mm (3d step file)
- Hammer joint parametric (link to Onshape model )
The example design (side table):
Tips for Using the Hammer Joint
The design of the joint is influenced by the thickness of the material you are using. It is important to select the appropriate version that suits your material. While I have tested various thicknesses and material combinations, you may need to make slight adjustments to the design based on your machine and intended use.
I intentionally designed the joint with a continuous outer perimeter (contour). This means that the cuts between the wedge and tenon are actually two closely spaced cutting lines. This is a consequence of modelling the joint in 3d, where the parts need to be watertight solids. From my experience, having a continuous contour also improves precision and quality during laser cutting. The laser can complete the entire joint in one operation, rather than jumping between separate lines.

If you decide to incorporate this joint into your own design, you will need to find a method to replicate it in various locations in your drawing. The specific approach will vary depending on your CAD program and your skill level. A 2D CAD tool like AutoCAD or Rhinoceros3D is highly recommended, but it is certainly possible to achieve this in other software such as Illustrator, Inkscape, or CorelDRAW.
For reference, my process is the following:
- I make a 3D design of my project in Onshape where I just draw blocks as joints. Not the real joint. Here is the Onshape document for the planter: link
- I use the Onshape AutoLayout feature to lay all parts flat, and then create an assembly and drawing with all the parts.
- I download the drawing as pdf, and import it into Rhinoceros.
- In the hammer joint design in Onshape, I set the thickness of the material I am going to use.
- I download the 2d files of the hammer joint.
- In Rhinoceros I copy the mortise and tenon to all locations where it is used.
- Then I export the 2D drawing for laser cutting.
Using the Parametric Model in Onshape
Onshape cad software that runs completely in your browser, so you do not need to install anything to use it. If you are familiar to fusion360 you will find it very similar in capabilities and use. They have paid plans but if you do not mind your designs being public, you can use it for free. You do need to create an account to enter though.
I have created a public document that contains the mortise and tenon. You can access the 3d file here:
Here you can view the design in 3D. But if you want to change the parameters (or change anything else) you need to create an account at Onshape and then clone the design. Once you have done that you can make modifications.
Adjust the Parameters
In the design tree on the left, you will see three variables (with the x-icon).
- tenon-sheet-thickness
- mortise-sheet-thickness
- laser-kerf
Double click them, type in a new value and hit the check mark to update the model
I know, you have seen the other variables in the "do not change" folder ;). You can experiment here, but note that they might lead to not-working results.
Exporting to PDF
Once you are happy with the design, you might want to get a 2d drawing to paste in your design. To export both parts in a single pdf, do the following:
- Click on the Drawing 1 tab on the bottom bar.
- Click on the yellow update button in the menu bar to update the drawing
- Click the hamburger menu and choose Print. This will open a new tab with the pdf file.
Exporting to DXF/DWG
You can also export directly to dxf/dwg.
- Head back to the Part studio by clicking the "fox wedge joint" tab in the bottom of the screen
- Right click on one of the parts and choose "Export as DXF/DWG...."
- In the popup, Choose the format that you want and click Export
End Notes
I would love to see what designs you come up with using this hammer joint! Feel free to share your creations via Instagram, LinkedIn or any other platform with us. If you have any questions or need further assistance, please do not hesitate to reach out to me via email at info@lasersheets.nl.
Disclaimer: Although we have extensively tested the hammer connection, we cannot guarantee that it will work well for you in your application. This work is intended as inspiration and as a starting point for your own designs. Good luck!